前言
上期视频(点击观看)我们讲到了如何在NAS里面搭建EMBY的媒体中心,来管理我们本地的片源,大家应该都去尝试了一下。群里小伙伴们都觉得这个媒体中心挺不错的,只是自己的片源太少。上期视频作者也是说到了,片源少可以通过拓展的方式取得片源,比如我们谷歌云的团队共享盘。
本身来讲,团队共享盘就是一个无限空间的个人网盘,但是有一部分团队在团队共享盘里面装载着精品的资源,并有专人的团队去维护这些资源,所以我们把这类的共享盘称之为精英盘。顾名思义,里面都是精英内容。今天这期视频我们就基于一个装载着大部分奈飞影音的精英盘为大家开展。
奈飞(Netflix)影音 – 谷歌团队共享精英盘官网地址:点击访问
准备工作
1、NAS一台
2、已经搭建EMBY媒体中心(不会请点击)
3、谷歌共享团队盘一个(奈飞影视精英盘官网直达)
4、NAS的科学上网环境(不会请点击)
5、其他的相关客户端在上期视频均有介绍
开始表演
一、检查谷歌云盘
检查GOOGLE云端硬盘里面是否有共享的云端云盘,当然你只有默认的15G的个人云盘也是可以完成挂载的。
快速直达谷歌云盘:点击直达
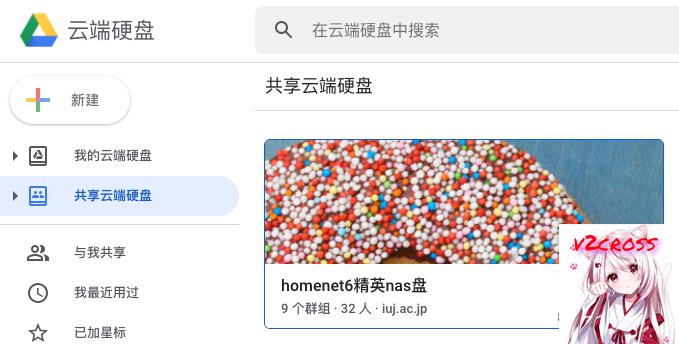
作者这边就只有一个购买的 影视精英盘 ,如图:
二、开启NAS的终端机设置ROOT连接
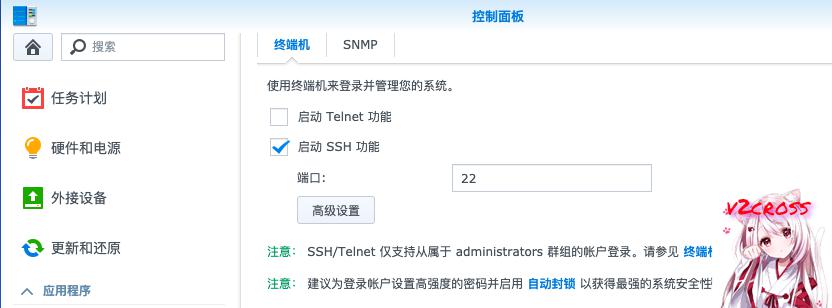
我们首先在NAS里面找到“控制面板” – “终端机和SNMP”,启动SSH功能,并应用。
打开FinalShell(或是其他SSH工具),用管理员的账号的密码连接我们的NAS。
输入 sudo -i 并输入密码,切换root用户,然后
- cd /etc/ssh
- chmod 755 sshd_config
- vim /etc/ssh/sshd_config
找到 #PermitRootLogin 开头的一行代码,按键盘 i 键进入改写模式,改为 #PermitRootLogin yes ,改写完成按键盘 ESC 键,输入 :wq 保存退出,然后输入 reboot 重启NAS。
重启完成,继续用管理员的用户登录SSH工具,输入 sudo -i 取得 root 用户权限,,输入 synouser --setpw root 密码
关闭SSH窗口,重新用 root 用户登录。
三、安装 rclone
rclone的官方安装教程:点击访问
输入以下代码安装 rclone
- curl https://rclone.org/install.sh | sudo bash
提示如下图就安装成功了,rclone本身也不大,所以安装还是很快的。

四、初始化并配置 rclone
输入以下代码,我们对rclone进行初始化的配置。
- rclone config
下面的步骤比较多,请大家仔细观看视频教程或是详细阅读博客。若是配置输入错误了请重新执行上面的配置代码。
这里我们选择N,创建一个名字,当然是随便的,建议简单一些,作者的名字是 gdnf (Google Drive NetFlix)
以下所有选项作者这边全部保存并注释了一下,大家请详细阅读。(根据提示选择你的选项,########后面为你修改的选项,请看清楚)
- root@NAS:~# rclone config
- 2020/06/15 23:25:54 NOTICE: Config file "/root/.config/rclone/rclone.conf" not found - using defaults
- No remotes found - make a new one
- n) New remote
- s) Set configuration password
- q) Quit config
- n/s/q> n ######## 这里选择N来创建我们磁盘的名字
- name> gdnf ######## 我们这里创建gdnf(Google Drive NetFlix)越简单越好
- Type of storage to configure.
- Enter a string value. Press Enter for the default ("").
- Choose a number from below, or type in your own value
- 1 / 1Fichier
- \ "fichier"
- 2 / Alias for an existing remote
- \ "alias"
- 3 / Amazon Drive
- \ "amazon cloud drive"
- 4 / Amazon S3 Compliant Storage Provider (AWS, Alibaba, Ceph, Digital Ocean, Dreamhost, IBM COS, Minio, etc)
- \ "s3"
- 5 / Backblaze B2
- \ "b2"
- 6 / Box
- \ "box"
- 7 / Cache a remote
- \ "cache"
- 8 / Citrix Sharefile
- \ "sharefile"
- 9 / Dropbox
- \ "dropbox"
- 10 / Encrypt/Decrypt a remote
- \ "crypt"
- 11 / FTP Connection
- \ "ftp"
- 12 / Google Cloud Storage (this is not Google Drive)
- \ "google cloud storage"
- 13 / Google Drive
- \ "drive"
- 14 / Google Photos
- \ "google photos"
- 15 / Hubic
- \ "hubic"
- 16 / In memory object storage system.
- \ "memory"
- 17 / Jottacloud
- \ "jottacloud"
- 18 / Koofr
- \ "koofr"
- 19 / Local Disk
- \ "local"
- 20 / Mail.ru Cloud
- \ "mailru"
- 21 / Mega
- \ "mega"
- 22 / Microsoft Azure Blob Storage
- \ "azureblob"
- 23 / Microsoft OneDrive
- \ "onedrive"
- 24 / OpenDrive
- \ "opendrive"
- 25 / OpenStack Swift (Rackspace Cloud Files, Memset Memstore, OVH)
- \ "swift"
- 26 / Pcloud
- \ "pcloud"
- 27 / Put.io
- \ "putio"
- 28 / QingCloud Object Storage
- \ "qingstor"
- 29 / SSH/SFTP Connection
- \ "sftp"
- 30 / Sugarsync
- \ "sugarsync"
- 31 / Tardigrade Decentralized Cloud Storage
- \ "tardigrade"
- 32 / Transparently chunk/split large files
- \ "chunker"
- 33 / Union merges the contents of several upstream fs
- \ "union"
- 34 / Webdav
- \ "webdav"
- 35 / Yandex Disk
- \ "yandex"
- 36 / http Connection
- \ "http"
- 37 / premiumize.me
- \ "premiumizeme"
- 38 / seafile
- \ "seafile"
- Storage> 13 ######## 这里选择 Google Drive ,所以我们选择13,大家看清楚自己的选项
- ** See help for drive backend at: https://rclone.org/drive/ **
- Google Application Client Id
- Setting your own is recommended.
- See https://rclone.org/drive/#making-your-own-client-id for how to create your own.
- If you leave this blank, it will use an internal key which is low performance.
- Enter a string value. Press Enter for the default ("").
- client_id> ######## 这里直接回车
- Google Application Client Secret
- Setting your own is recommended.
- Enter a string value. Press Enter for the default ("").
- client_secret> ######## 这里直接回车
- Scope that rclone should use when requesting access from drive.
- Enter a string value. Press Enter for the default ("").
- Choose a number from below, or type in your own value
- 1 / Full access all files, excluding Application Data Folder.
- \ "drive"
- 2 / Read-only access to file metadata and file contents.
- \ "drive.readonly"
- / Access to files created by rclone only.
- 3 | These are visible in the drive website.
- | File authorization is revoked when the user deauthorizes the app.
- \ "drive.file"
- / Allows read and write access to the Application Data folder.
- 4 | This is not visible in the drive website.
- \ "drive.appfolder"
- / Allows read-only access to file metadata but
- 5 | does not allow any access to read or download file content.
- \ "drive.metadata.readonly"
- scope> 1 ######## 这里选择1
- ID of the root folder
- Leave blank normally.
- Fill in to access "Computers" folders (see docs), or for rclone to use
- a non root folder as its starting point.
- Note that if this is blank, the first time rclone runs it will fill it
- in with the ID of the root folder.
- Enter a string value. Press Enter for the default ("").
- root_folder_id> ######## 这里直接回车
- Service Account Credentials JSON file path
- Leave blank normally.
- Needed only if you want use SA instead of interactive login.
- Enter a string value. Press Enter for the default ("").
- service_account_file> ######## 这里直接回车
- Edit advanced config? (y/n)
- y) Yes
- n) No (default)
- y/n> n ######## 这里选择N
- Remote config
- Use auto config?
- * Say Y if not sure
- * Say N if you are working on a remote or headless machine
- y) Yes (default)
- n) No
- y/n> n ######## 这里选择N
- Please go to the following link: https://accounts.google.com/o/oauth2/auth?access_type=offline&client_id=202264815644.apps.googleusercontent.com&redirect_uri=urn%3Aietf%3Awg%3Aoauth%3A2.0%3Aoob&response_type=code&scope=https%3A%2F%2Fwww.googleapis.com%2Fauth%2Fdrive&state=M4gv7ED98GhPMGgHUIs9wg
- Log in and authorize rclone for access
- Enter verification code> ######## 这里输入上面HTTPS里面打开并授权的秘钥
- Configure this as a team drive?
- y) Yes
- n) No (default)
- y/n> y ######## 这里选择Y
- Fetching team drive list...
- Choose a number from below, or type in your own value
- 1 / homenet6精英nas盘
- \ "0AAf4ySrzi3ORUk9PVA"
- Enter a Team Drive ID> 1 ######## 这里选择1(根据自己的序号来,选择自己需要加载的共享盘)
- --------------------
- [gdnf]
- type = drive
- scope = drive
- token = {"access_token":"ya29.a0AfH6SMBF-_s-7-UcRq4WsAPqDj3V5Wa3UHNDFjfijAVTXrh5Ye15cUl7rhTpHo2S6wIYBGOnt9d7MV_gYckcHfk49n-yQ1BAb0Kj3P2e62vz2dGZ_BLoll2YlxWYo7aQnHvcw8UM7MZV7v83sdmGgSoDugo6OdXjT5k","token_type":"Bearer","refresh_token":"1//0eXNMszwdN8SvCgYIARAAGA4SNwF-L9Irl7qUev1cdWPJn3ovGQTxqmomauTFfOqShjmtMmnB8V2_0PLexmJJGU-eH3hIaw9FvXE","expiry":"2020-06-16T00:26:29.034414257+08:00"}
- team_drive = 0AAf4ySrzi3ORUk9PVA
- --------------------
- y) Yes this is OK (default)
- e) Edit this remote
- d) Delete this remote
- y/e/d> y ######## 这里选择Y
- Current remotes:
- Name Type
- ==== ====
- gdnf drive
- e) Edit existing remote
- n) New remote
- d) Delete remote
- r) Rename remote
- c) Copy remote
- s) Set configuration password
- q) Quit config
- e/n/d/r/c/s/q> q ######## 这里选择q
- root@NAS:~#
到此我们的 rclone 就配置完毕了。
五、在NAS创建 rclone 挂载所需目录
打开“控制面板” – “共享文件夹”,随便创建一个目录(推荐英文名字)作为我们rclone的挂载映射目录。
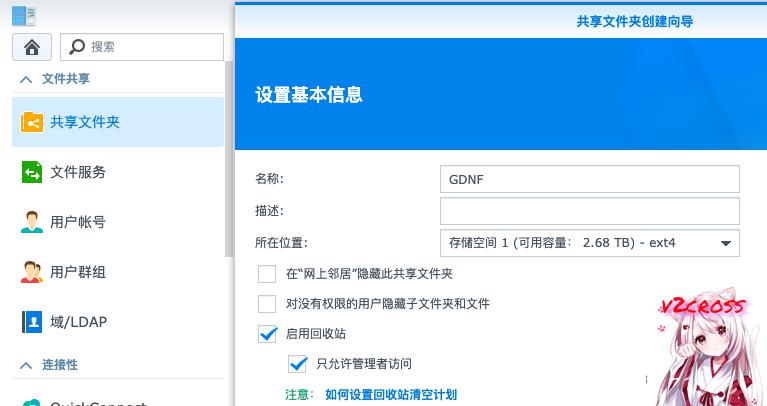
一直下一步,直到出现权限窗口,赋予embyserver读写的权限,如下图

回到我们的SSH窗口,继续输入如下代码
- rclone mount gdnf:/ /volume1/GDNF --allow-other --allow-non-empty --vfs-cache-mode writes &
简单解释一下代码
gndf 为我们开始配置时候的 name,:/是挂载你刚才选定共享盘根文件夹里面所有东西,/volume1/GDNF 为NAS我们刚才创建的文件夹(第一块磁盘根目录下面的GDNF文件夹)
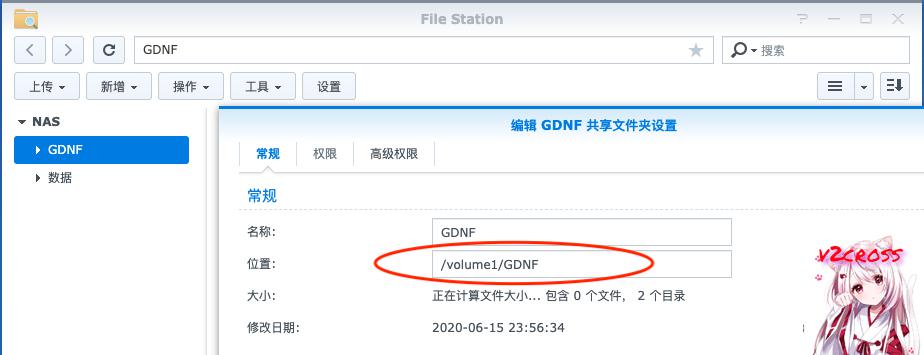
若是对于 /volume1/GDNF 路径地址不了解,可以看下图
打开NAS桌面的 File Station ,在刚才新建的文件夹上面点击鼠标右键 – 属性,会出现如下图,里面的位置就是我们需要填写的路径。
代码运行成功以后会提示类似的信息:(数字不用管)
- root@NAS:~# rclone mount gdnf:/ /volume1/GDNF --allow-other --allow-non-empty --vfs-cache-mode writes &
- [1] 24591
你可以在SSH窗口输入 df -h 进行验证,会多了一个 gdnf 的磁盘。如图:
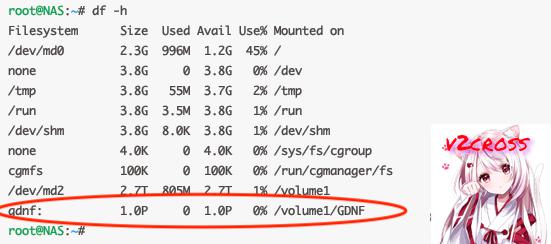
输入以下命令可以卸载磁盘,里面的路径同上所述
fusermount -qzu /volume1/GDNF
挂载成功以后,我们在NAS里面刚才新建的文件夹里面可以看到和共享盘里面同样的目录,如图
六、设置 rclone 开机自启
下载如下脚本并编辑,命令如下
- wget https://www.v2cross.com/wp-content/uploads/rcloned && vim rcloned
- #备份地址 https://raw.githubusercontent.com/V2RaySSR/Tools/master/rcloned && vim rcloned
我们修改配置文件如下:(按下键盘的 i 键进入编辑模式)
- REMOTE='gdnf:/' (配置rclone时候设置的名字,后面加上:/,代表挂载所有文件夹)
- LOCAL='/volume1/GDNF' (上面NAS里面新建文件夹的绝对路径)
- CONFIG='/root/.config/rclone/rclone.conf'
- DEMO='rclone'
按下键盘 esc 键退出编辑模式,然后输入 :wq 对刚才的编辑进行保存。
输入以下命令
- bash /root/rcloned start
然后我们转到NAS面板,找到“控制面板” – “计划任务” – “新增” – “触发的任务” – “用户定义的脚本” – “任务设置”,在 “用户定义的脚本” 里面输入 bash /root/rcloned start,在 “常规” 里面设置任务的名字。
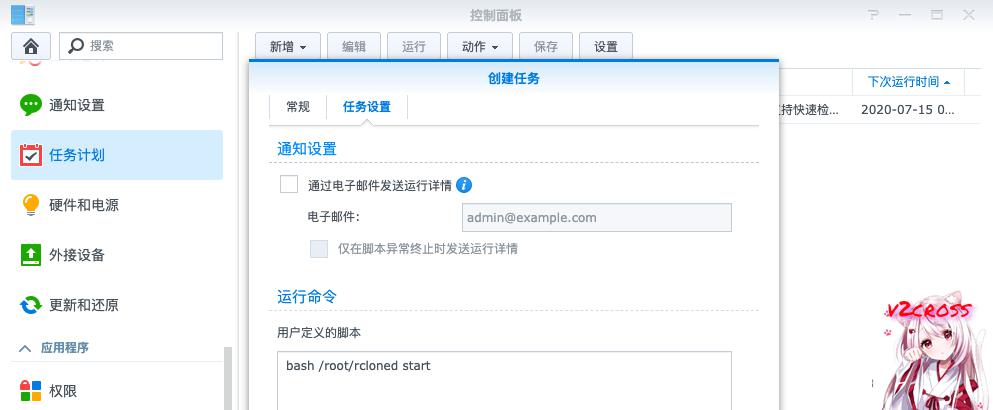
然后启用这项计划任务,并保存!

七、至此,rclone 安装设置完毕
附带其他的命令
- 开始挂载 bash /root/rcloned start
- 停止挂载 bash /root/rcloned stop
- 重新挂载 bash /root/rcloned restart
- 查看日志 tail -f /$HOME/.rclone/rcloned.log
设置EMBY媒体库
因为本身这个共享给我们的精英盘人家已经是做好了维护,也就意味着很多硬盘的元数据包括字幕等信息,其实是包含在我们的云盘里面的,所以其实我们是不需要设置搜刮器去搜刮相应的元数据。所以,推荐按照作者的后台设置进行设置,由于图片比较多,博文就不详细写明了,请大家对照视频进行设置
上期视频我们也讲到了,在EMBY里面电影和电视剧我们需要分开存放,不然会严重的影响使用,我们注意到这个精品盘里面的视频是有五个文件夹,其中分别是 奈飞电影(NetflixFilm)、热门电影(HotFilm)、奈飞电视剧(NetflixTV)、热门电视剧(HotTV)、儿童专区(P_Child),所以意味着我们需要在EMBY里面设置五个媒体库。具体请看视频教程
后记
说句实话,若是大家有这个心思去自己整理电影数据,那是最好不过,若是懒得整理这些头疼的资源,不妨来一个别人已经整理好的共享精英盘。方便,实用!若你仅仅只是对精英盘里面的电影感兴趣,又没有奈飞账号或是合适的梯子,那么这里也是提供收费的影视服务。详情请点击